First |
Previous Picture |
Next Picture |
Last
Use above nav links or side bar to see all of Mark's Redneck Pool Heater photos. He shared lots of photos from his build plus he emailed the below description and details.
HI TODD THANKS FOR ALL THE HELP AND INFO. I HAVE FINISHED MY HEAT EXCHANGER AND I MUST SAY IT WORKS PERFECT. I HAVE HAD MY POOL TEMPERATURE UP TO 40C {104F} DEGREES SO FAR IN NO TIME AT ALL COMPARED TO MY 3KW ELECRO 800 SERIES POOL HEATER. I AND MY KIDS HAVE BEEN IN THE POOL NEARLY EVERY DAY NOW SINCE I HAVE INSTALLED THIS HEAT EXCHANGER AND 150,000 BTU BURNER.
I HAVE ENCLOSED SOME PICS FOR YOU TO UPLOAD TO YOUR SITE FOR OTHER PEOPLE TO HAVE A LOOK AT. IM JUST AMAZED HOW GOOD THIS ACTUALLY WORKS
AND HOW QUICK IT WARMS THE POOL WATER UP.
ALL THE BEST FOR THE FUTURE AND UPCOMING PROJECTS.
MARK ROBERTSHAW
---------------------------------------------------
On Wed, Apr 7, 2010 at 9:54 AM,
W ROBERTSHAW wrote:
Just a quick intro on what I used and how I did it so you can add this to the site with my pictures of my heat exchanger that I made.
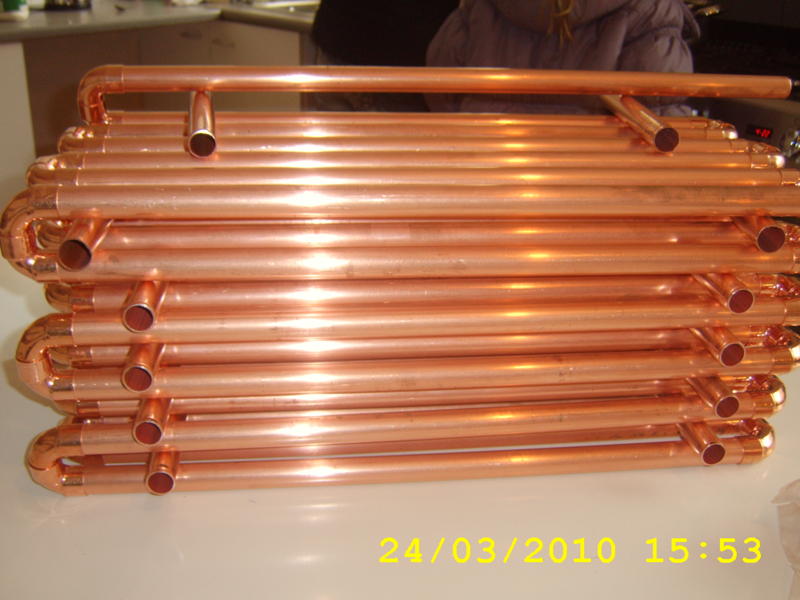
22mm copper pipe 10x 3m
40x flowfelx street elbows
40x flowflex end feed elbows
the above elbows are male and female
lead free solder
flux
wire wool
sack ties bought from ebay
I cut the 22mm copper pipe to 22'' sections so I got 5 lengths out of a 3 meter length of pipe. I cut 8 full lengths of pipe giving me 40 22'' pieces in total so there was not much waste from each length of pipe. Then cleaned every end with wire wool, then fluxed every end and dry built the heat exchanger in sections one level at a time to lock the pipes together. I cut 10 lengths of 22mm copper pipe to 12'' and wire tied them to each level of the heat exchanger.
You can see from the pictures I have included that I soldered one full level at a time. Just try to make sure you have it all on a flat surface so all the pipes are level. I had my water input at the bottom and output on the top at just one side of the heat exchanger which works perfect once I soldered it all together.
I cut 4 further pieces of 22mm pipe 8'' long for the legs and soldered them to the bottom frame work that the first level is fixed to. This works 100% efficient with the 150,000 btu burner underneath and I have had my pool up to 36C degrees already from 20C degrees. It only takes me 3-4 hours depending on weather temperature to increase my water temperature to 34C degrees which works out to about £4.00 for the 3-4hrs period of heating my pool from 20C degrees to 34C degrees. These figures are based on my 12ft metal framed pool 3ft deep and is enclosed with a 4meter hexagonal gazebo with no pool cover at all. To get the best results use a solar pool cover as I am at the moment this stops a lot of the heat loss when not in use especially over night when it will drop when heater is not in use.
As for the 150,000btu burner I have the heat exchanger sat 7'' above it and this works really really well. I'm still amazed how good this work's and how warm the water gets. As you can see from the pictures I just roughly built a enclosure for the burner and heat exchanger using airated blocks and used the spare ones for the top to act as a chimney which works 100%. All the hot air rises and even keeps the top pipes hot so there are no cold spots on the heat exchanger.
At the end of the day I'm a fully qualified chef who is pretty good at plumbing. Any way and this entire project took me around 30-40 hrs to achieve
One more point I will make is that I pressure tested the heat exchanger with air before I had any water running through it to make sure there were no leaks and there was not one. If you do not do this before hand you will not be able to solder any leaks once there is any moisture or water in the pipes so you will be left with an expensive pile of scrap.
All the best for the future Todd.
Regards, Mark Robertshaw
